

Register Rowseta for LTI launches
The LTI registration lets people open Rowseta and its insight widgets from inside Brightspace. You do it once per Organization. Dynamic registration is recommended: you paste one link into Brightspace and Brightspace fills in the rest.
If you don’t see this menu or button, your role doesn’t include it. Ask someone who can edit roles (Owners and Admins by default).
In Brightspace, you need an administrator account that opens Admin Tools > Manage Extensibility.
1. Create a setup link in Rowseta
Section titled “1. Create a setup link in Rowseta”- In the sidebar, select Integrations > LTI placements.
- Under How would you like to register?, select Dynamic registration.
- Select Generate setup link.
- Copy the link with the copy button. Copy it now: it is not shown again. The card shows how long the link stays valid (Expires in …).
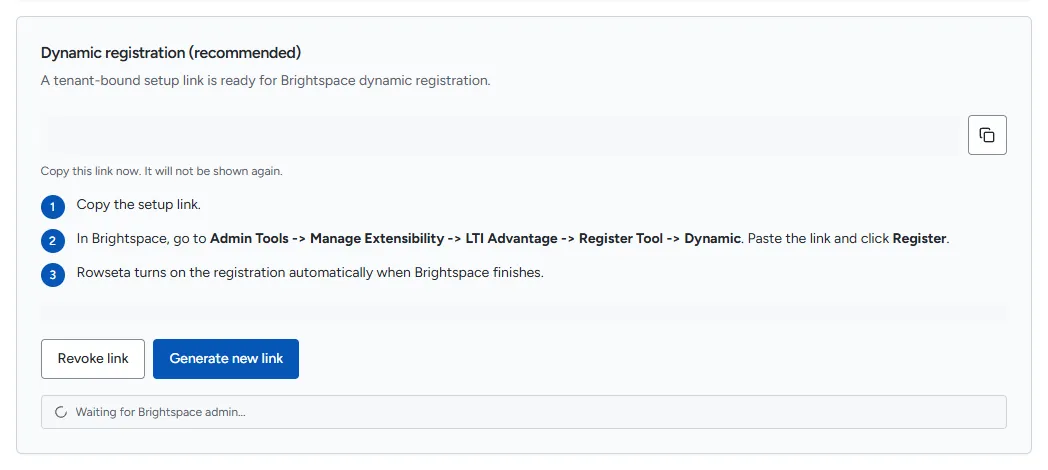
If the link expires, or you closed the page before copying it, select Generate new link. Generating a new link stops the old one from working. Revoke link cancels a link you no longer need.
2. Register in Brightspace
Section titled “2. Register in Brightspace”- In Brightspace, go to Admin Tools > Manage Extensibility > LTI Advantage > Register Tool.
- Choose Dynamic.
- Paste the setup link.
- Tick Configure Deployment. This creates the deployment and the launch link for you.
- Select Register.
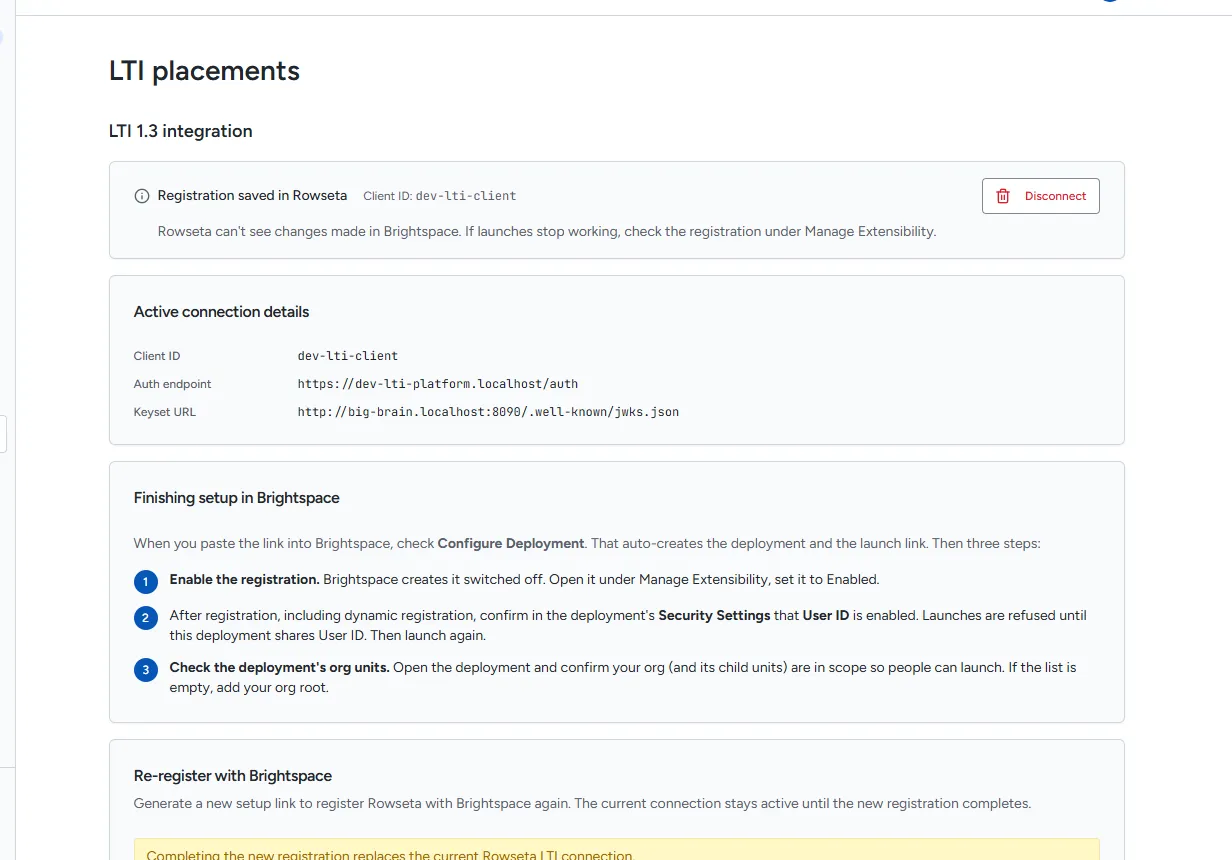
Brightspace shows Rowseta is registered. and closes the window. Back in Rowseta, the LTI placements page shows Brightspace finished registration. and Registration saved in Rowseta, with the Client ID.
3. Finish setup in Brightspace
Section titled “3. Finish setup in Brightspace”The Finishing setup in Brightspace card lists three steps. Do all three.
Enable the registration
Section titled “Enable the registration”Brightspace creates the registration switched off. In Manage Extensibility > LTI Advantage, open the Rowseta registration and set it to Enabled.
Turn on User ID in Security Settings
Section titled “Turn on User ID in Security Settings”Open the Rowseta deployment and, under Security Settings, make sure User ID is ticked, then save. Launches are refused until the deployment shares User ID. See The User ID security setting.
Check the deployment’s org units
Section titled “Check the deployment’s org units”Open the deployment and confirm your organization (and the org units below it) are in scope, so people in those courses can launch Rowseta. If the list is empty, add your org root.
Test a launch
Section titled “Test a launch”In Brightspace, open the Rowseta link from a course as a test user. If User ID is off, the launch is refused and Integrations > LTI placements shows a banner with the fix. The banner clears after a successful launch.
If the registration was staged
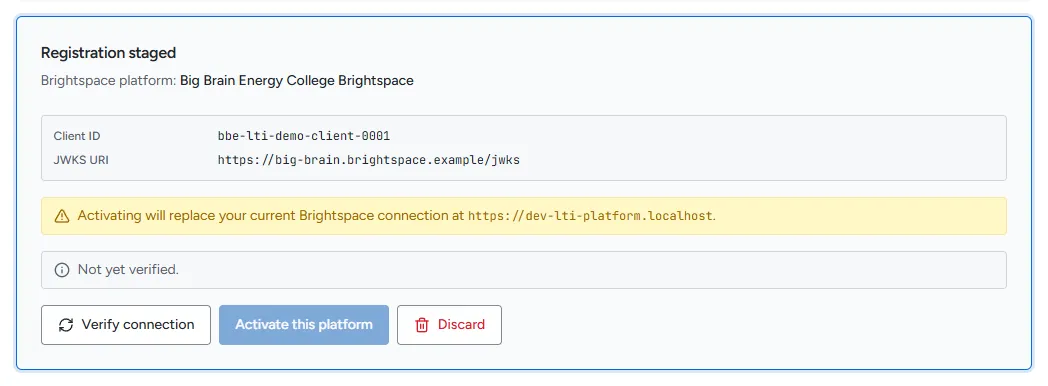
Section titled “If the registration was staged”Sometimes Rowseta cannot check Brightspace’s signing keys during registration. Brightspace then shows Registration received, and Rowseta emails its administrators a link titled LTI registration needs verification. The LTI placements page shows a Registration staged card with the Brightspace platform name.
- Open Integrations > LTI placements (or the emailed link).
- Select Verify connection. When it passes, the card says Verified at and the time.
- Within 5 minutes, select Activate this platform. Rowseta shows Brightspace is now connected.
If verification fails, the card shows Verification failed: and the reason. Fix it in Brightspace (usually the registration is disabled or its keyset address is wrong), then verify again. To throw the staged registration away, select Discard and type the platform name to confirm.
Standard registration (manual)
Section titled “Standard registration (manual)”Use this only if dynamic registration is not possible.
- On Integrations > LTI placements, select Standard registration (or Use standard registration instead).
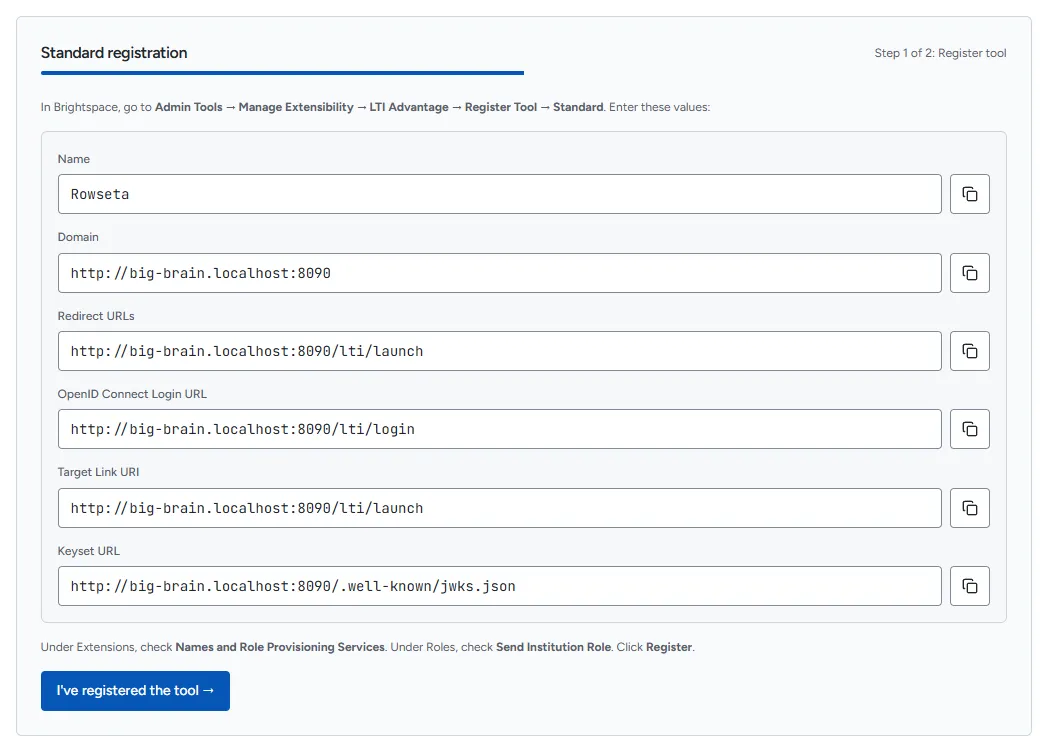
- In Brightspace, go to Admin Tools > Manage Extensibility > LTI Advantage > Register Tool > Standard and enter the values Rowseta shows: Name, Domain, Redirect URLs, OpenID Connect Login URL, Target Link URI and Keyset URL. Use the copy buttons.
- Under Extensions, tick Names and Role Provisioning Services. Under Roles, tick Send Institution Role. Select Register.
- In Rowseta, select I’ve registered the tool, then paste the values Brightspace shows: Client ID, Brightspace Keyset URL, Deployment ID, Brightspace OAuth2 Access Token URL (pre-filled), OpenID Connect Authentication Endpoint and Issuer.
- Select Save registration.
- Do the three steps in Finish setup in Brightspace.
Register again or disconnect
Section titled “Register again or disconnect”- Re-register with Brightspace: select Generate setup link on the re-register card and repeat the dynamic registration. The current connection stays active until the new registration completes, then the new one replaces it.
- Advanced: edit connection details by hand: only if you re-registered manually in Brightspace and received new values.
- Disconnect: removes the registration. LTI launches stop working until you register again.
Rowseta cannot see changes made in Brightspace. If launches stop working, check the registration under Manage Extensibility first.