

Put a widget in a Brightspace course
A widget reaches a course through a Brightspace LTI link of type Widget. You create the link once per widget, then add it to any course homepage.
If you don’t see this menu or button, your role doesn’t include it. Ask someone who can edit roles (Owners and Admins by default).
In Brightspace, use an administrator account that manages LTI Advantage tools and course homepages.
Before you start
Section titled “Before you start”Rowseta must be registered in Brightspace as an LTI tool, with User ID turned on in the deployment’s Security Settings. See Register Rowseta for LTI launches.
1. Open Publish to LMS
Section titled “1. Open Publish to LMS”- In Rowseta, select Insight widgets.
- On the widget’s card, select Publish to LMS.
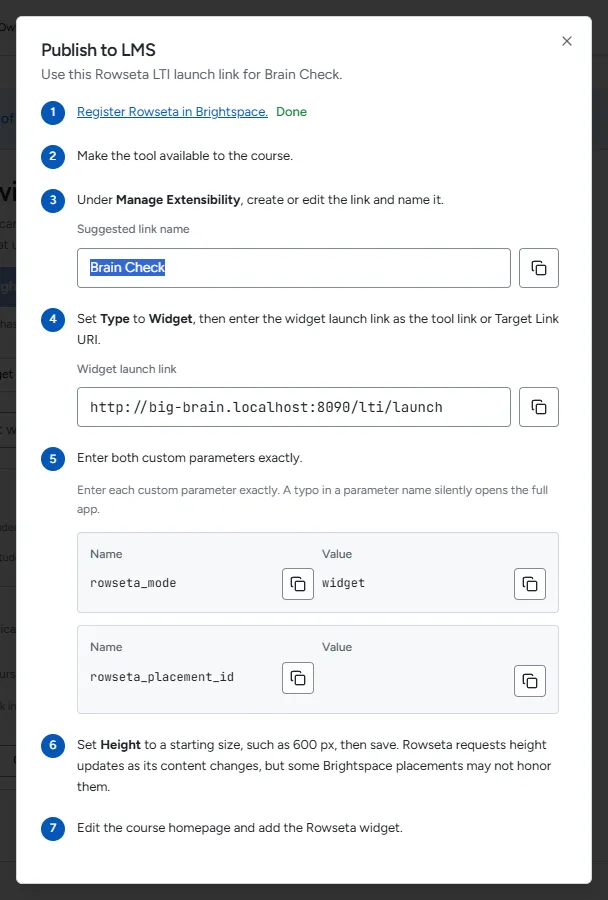
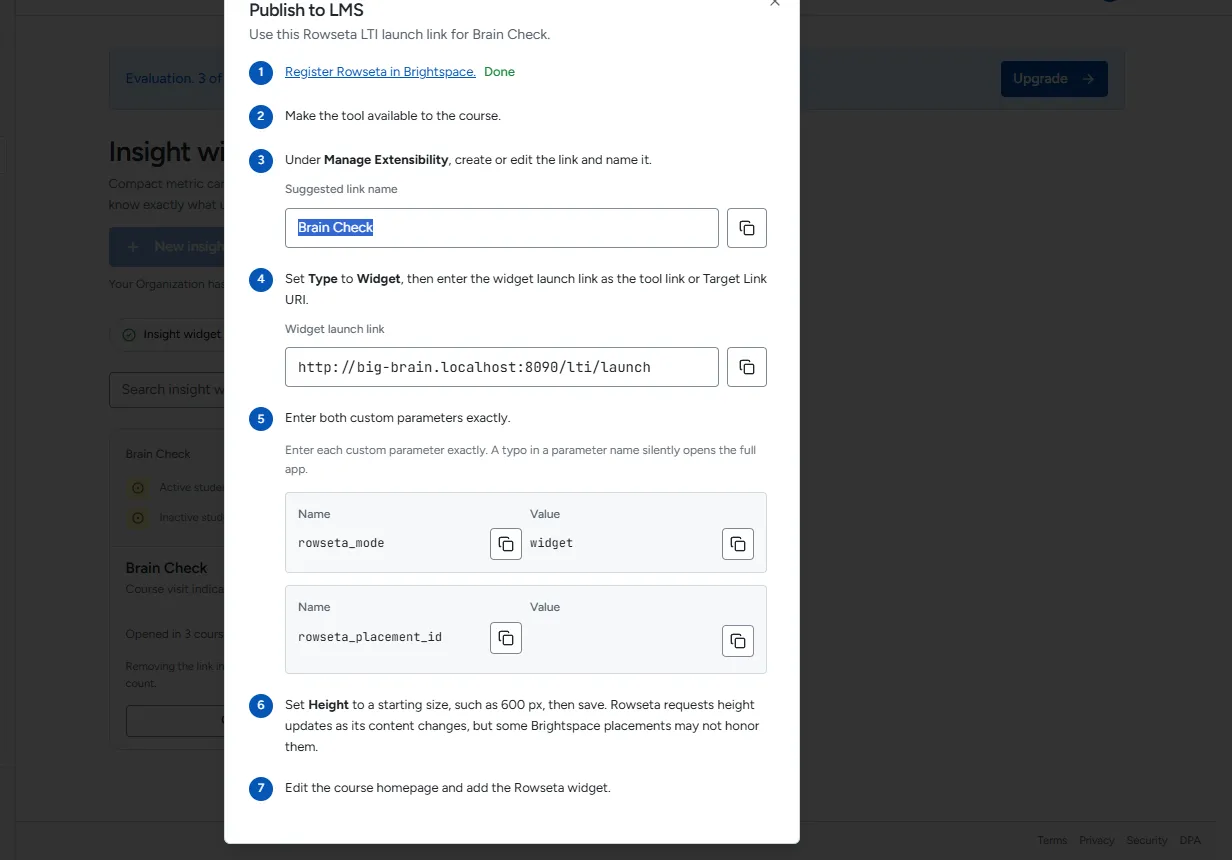
The Publish to LMS dialog lists the steps and the exact values to copy.
2. Confirm the registration
Section titled “2. Confirm the registration”Step 1 in the dialog, Register Rowseta in Brightspace, shows Done when Rowseta already has an LTI registration. If it does not, follow the link and register Rowseta first.
3. Make the tool available to the course
Section titled “3. Make the tool available to the course”In Brightspace, make sure the Rowseta deployment includes the course’s org unit (or a parent of it, such as your whole organization). See Check the deployment’s org units.
4. Create the widget link
Section titled “4. Create the widget link”- In Brightspace, go to Admin Tools > Manage Extensibility > LTI Advantage, open the Rowseta registration and its deployment, and create a new link.
- Name: copy Suggested link name from the dialog. It is the widget’s name.
- Type: choose Widget.
- URL (also called Target Link URI): copy Widget launch link from the dialog. It is your
Rowseta address followed by
/lti/launch, for examplehttps://big-brain.rowseta.com/lti/launch.
5. Add the two custom parameters
Section titled “5. Add the two custom parameters”Enter both custom parameters on the link exactly as the dialog shows them. Use the copy buttons for each Name and Value:
| Name | Value |
|---|---|
rowseta_mode |
widget |
rowseta_placement_id |
this widget’s ID, shown in the dialog |
6. Set the height and save
Section titled “6. Set the height and save”Set Height to a starting size, such as 600 px, then save the link. Rowseta asks Brightspace to resize the widget as its content changes, but some Brightspace placements may not honour this.
7. Add the widget to the course homepage
Section titled “7. Add the widget to the course homepage”- In the Brightspace course, edit the course homepage.
- Add the widget named after your link.
- Save the homepage.
8. Check it
Section titled “8. Check it”Open the course homepage as an instructor. The widget shows Computing metrics the first time, then the numbers. The widget now appears in Courses using this widget in Rowseta, and the setup checklist marks Place it in Brightspace as Done.
If you see a message instead, look it up in Troubleshooting Brightspace launches.
Counting courses
Section titled “Counting courses”The widget card and the dialog say Opened in N courses so far. A course counts once someone opens the widget there. Removing the link in Brightspace does not change this count.
Release a course
Section titled “Release a course”Open the widget in Rowseta and find Courses using this widget. Select Release this course beside the course and confirm. This frees its Evaluation slot and clears that course’s widget settings. A later launch uses a slot again if one is free.